Can you hang a mirror with command strips? Why not!
We love to use wall mirrors as decor for our home. They really create a new dimension in our living spaces, adding a new layer to the furniture and making the entire place look more spacious. Mirrors these days are no longer the drab functional pieces that they used to be, but rather works of art on their own.
Over the years, we have gained lots of experience in hanging and decorating with mirrors. It is not every surface where you can drill a hole in the wall or use nails and screws to hang a mirror, or you might want a simpler solution to hanging them on the walls.
Maybe you just want a short-term fix, knowing that you might move the mirror elsewhere later on (or you are a renter), or you want the installation to be hassle-free. In such situations, can you use 3M Command Strips to hang a mirror?
Yes, you can hang a mirror with Command Strips as long as you use the right amount to support the weight of the mirror. Each strip can support a certain amount of load, and when combined together, these weight thresholds can be increased to support even some large mirrors. You also need to ensure that the surface is prepped properly before mounting. The advantage of these strips is that they make removal very easy. Almost all types of mirrors can be hung this way, including frameless mirrors, full-length mirrors, bathroom mirrors, and more.
Find out how much weight Command Strips can hold here.
Related post: 8 Best Alternatives to Command Strips For Hanging Wall Decor And More
[block id=”7091″]
[block id=”sign-up-for-amazon-prime”]
What are Command Strips?

Command Strips are a product under the Command brand, which is owned by the conglomerate 3M. The actual name is Command Picture Hanging Strips, and as the name suggests, it was created to hanging pictures, but can be used for hanging mirrors too.
Under Command, there are lots of other self-adhesive products that are designed for use in households, both indoors and outdoors.
We have a few of these products around our home too like hooks for towels and an under-sink caddy. Not to mention the Command Strips we used to hang some wall art and mirrors.
The unique thing about their special adhesives is that they don’t leave any marks behind after removing them, unlike other low-quality adhesives that leave behind ugly residues (This is due to a patented ingredient they use to manufacture the product, which probably explains why other competitors are not that good). If you are caught in such a situation, you might want to check out how to remove adhesives from a wall mirror.
Not only are these strips easy to install and remove, but they are also very reliable when holding objects up to their weight limits. We had used other products in the past and I have to say that the experience was not up to scratch. Only Command held up their weight, making them the perfect way to hang a mirror without nails or hooks.
What kind of surfaces can Command Strips be used on?
It may seem that Command Strips are super useful and effective, and they are. But you need to take note of the kind of surface you are using them on.
Unfortunately, these little strips do not stick on everything. So the next time you think of sticking them to any random surface, don’t! Read this first!
Here are the surfaces that you can use Command Strips on:
- Painted wallboard
- Painted, stained, or varnished wood
- Glass/mirrors
- Tiles
- Plaster
- Metal
- Other smooth surfaces such as vinyl, doors, windows
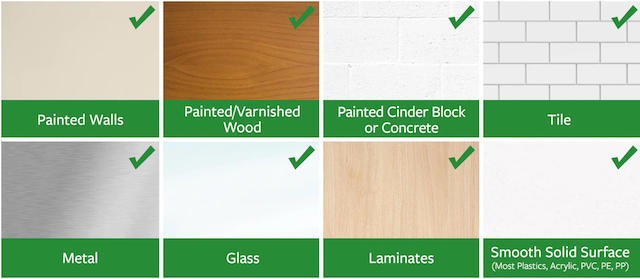
As you can imagine, these strips will work only on smooth surfaces (not wallpaper though, they are too thin to hold weight). Do not attempt to use them on rough or textured surfaces like cement, brick, or fabric.
One more thing to take note of is that if you have just painted a wall or just treated a surface, always give in enough time to cure (refer to manufacturer instructions). This could be a few days to a couple of weeks, so be sure to check properly.
What are the options and sizes available?
I appreciate the fact that there are lots of options available when choosing the right Command Strip to use. They come in a few different sizes that can cater to all sorts of projects. Here is a quick look at them:
Small Picture Hanging Strips: holds up to 4 lbs (1lb per pair of strips)

Medium Picture Hanging Strips: holds up to 12 lbs (3lbs per pair of strips)

Large Picture Hanging Strips: holds up to 16 lbs (4lbs per pair of strips)

Small and Medium Combo Pack

Medium and Large Combo Pack

There are a lot of other options available, so do check out their store or visit your local hardware shop that likely carries these.
What are mistakes to avoid when using Command Strips?
The first time I used Command Strips, I came away swearing that I will not use them ever again. They did not stay on for long and my wall art dropped on the floor. Thankfully the glass cover did not break.
I subsequently realized that I made some mistakes that caused this, and now I know better.
Without trying to overcomplicate matters, here are some pointers you should know before using them.
- Follow the guideline provided on the packaging. If the packing says that it supports up to 16 lbs, don’t try to hang something that is heavier than that. You should also take into consideration the size of the strips. You can’t expect small strips to support a large object.
- Clean the surface where you are sticking Command Strips. If the surface is not cleaned thoroughly before using, there might be dirt or grime that can impede the performance.
- Stick them in the right spots. Placement of the Command Strips should not be a random exercise. Depending on the number of strips that you use, always start at the top and spread them out evenly. Corners are your best bet to get maximum strength.
- Apply pressure to the tape for at least 30 seconds. According to the manufacturer’s instructions, you need to press and hold onto the strips after sticking them on. This is to allow it to adhere to the wall completely.
- Give it time to work. I do not hang my mirrors right after the 30 seconds. Typically, I give it a few hours or sometimes even a day before I hang them.
How to use Command Picture Hanging Strips? Steps to hang a mirror with Command Strips
To get the most out of your hanging strips, the installation part is key. With the right installation, you can ensure that they work well and last long.
Here are the steps you should take for using Command Strips:
Step 1: Always make sure to weigh the object you are hanging first
You DO NOT want to hang something that is heavier than the limits prescribed on the packaging or you risk it dropping and getting damaged!
Step 2: Clean the surface with rubbing alcohol
Do not use cleaning agents such as cleaners or even water as they might leave behind a thin layer of residue that will affect the adhesiveness of the strips.
Step 3: Determine the number of strips you need to use
Attach each pair together and make sure you hear a click that the Velcro makes.
Step 4: Affix the strips
Now, remove the protective layer of one side of the strip and paste it on the frame. Make sure to start from the top and in the corners. You need to make sure that the pull tab is facing downwards (indicated by the 3M logo with a down arrow).
Step 5: Position it on the wall
Remove the other side of the adhesive and place the mirror in the desired position. I always mark out the top and side edges lightly with a pencil so that I won’t mess up.
Press and hold the mirror against the wall firmly for at least 30 seconds.
Step 6: Give the adhesive time to cure
Peel the mirror off by lifting it from the bottom of the mirror. Do not yank the mirror off the wall! This is a temporary step that will allow the adhesive on the wall to stick properly. After an hour or two, you may stick the mirror back on the wall, taking care to align the strips and hearing the click sound.
Check out this video to get a visual understanding:
How to remove Command Strips?
The ease of removing Command Strips is what makes them such great tools for the home. You can easily remove a strip in seconds and not leave any damage or holes in your wall, but you need to do it right.
Here’s what you should do:
- Remove the mirror or frame by lifting it from the bottom towards you
- You will now see the strips left on the wall
- Hold down the strip and slowly pull down the release tab and it will start to detach from the wall. Do not pull towards you. Pull down
Check out the video for a better understanding (skip to 1:01 mark)
Common downsides of using Command Strips
Well of course nothing is perfect, and there are a few downsides and complaints when it comes to using Command Strips.
That said, most of this unhappiness comes more from not using the product properly, especially the installation process as described above.
Firstly, you need to take the time and effort to make sure that you are installing the strips correctly.
Follow the guidelines I have provided above to get it right.
Before you start, figure out the type of strips you need based on the object weight. You can’t change this later on!
Making sure the surface is cleaned and applying pressure to the strip right after installation are the 2 key things that will ensure success and not having your mirrors shattered on the ground.
Secondly, some people will complain that the price of installation can be quite high. I think it’s kind of an unfair comparison.
Sure, using nails and a hammer probably cost you next to nothing, but you will be leaving holes in your wall. If this is not something you want, then Command Strips will be your best friend. Bear in mind too that you will have to incur costs when covering up holes and painting over.
Again, back to the installation process. If you follow the details above, marking out your spot, measuring the weight, you will not get it wrong. Some people don’t do that and botch the installation and end up having to do it again (Command Strips are not reusable), driving up the cost. You can easily avoid that after going through this article.
Are Command Strips worth it?
Can you hang a mirror with Command Strips? Absolutely. Are they worth it? I tend to think so.
They certainly serve a purpose, and they perform their job really well. I used them heavily when decorating my gallery wall.
I like that they are super functional and can be used on a wide variety of wall surfaces without sacrificing their effectiveness.
The installation is easy and removal is a breeze too.
Although the cost can be high, they outweigh the fact that I have to leave holes in my wall. Not to mention some folks who are renting and are restricted in nailing things to the walls.
At the end of the day, they are an excellent tool to have, considering that there are really not many alternatives to Command Strips besides double-sided tape or mounting tape (both of which are nowhere as effective or holds as much weight).
Give them a try and I believe you will be a convert after one attempt.
What’s next?
Now that you are a pro with Command Strips, be sure to check out other articles on our blog such as how to pack mirrors for moving, how to care for mirrors, and outdoor garden mirrors ideas amongst many others.
